3.0 Ziti services
3.1 Introduction
In this guide, we will demonstrate ziti services with three examples:
- connection between two identities running ziti-edge-tunnel
- connection between ziti-edge-tunnel and a ziti-router (with tunnel enabled)
- connection from a non-OpenZiti endpoint using router as GW
This guide provides both CLI and GUI (ZAC) instructions. To use ZAC, make sure ZAC is installed. If you have not installed ZAC, and would like to use it in this section, please follow the ZAC Setup Guide before continue.
3.2 Setup VMs for ziti network
3.2.1 Controller
3.2.1.1 ZAC
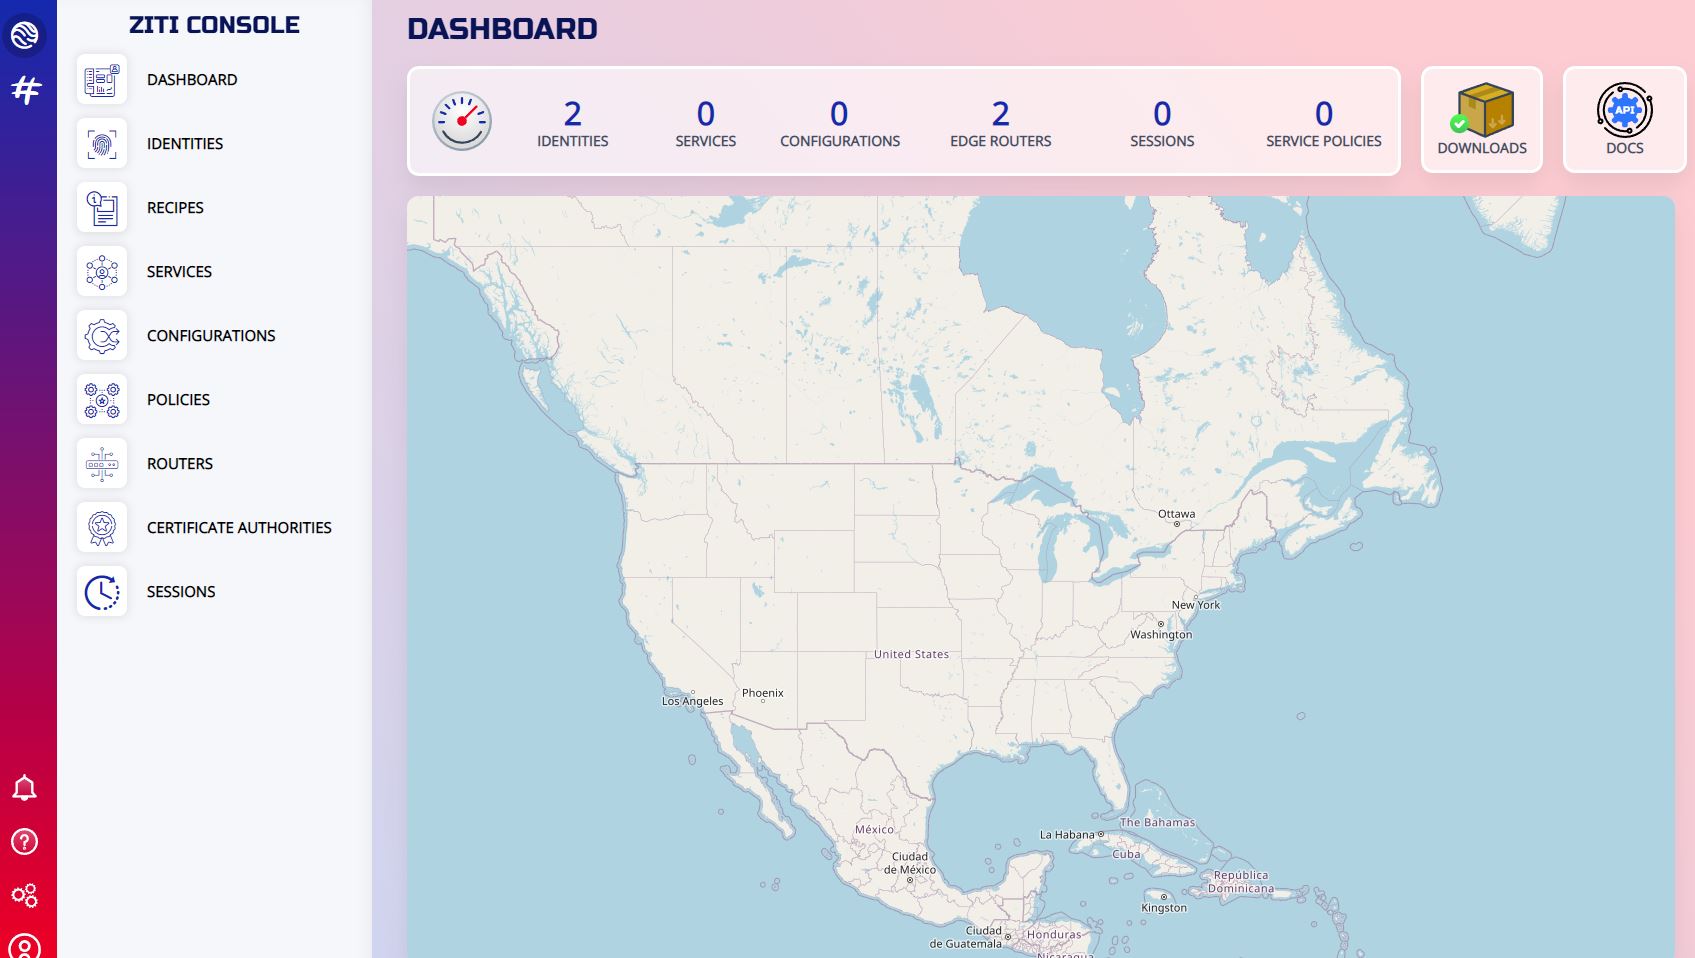
Please make sure you can login to your network and see the welcome screen before continue.
3.2.1.2 CLI
You will need to login to controller to provision identities and service. Please make sure you are performing the action on the right node.
On the controller, before performing the CLI command, you will need to login first:
zitiLogin
The login token expires after a period of time. If the token expired, you will need to login again via the same command. You will see error message like this when the CLI logs out:
error: error listing https://161.35.108.218:8441/edge/management/v1/config-types?filter=id%3D%22host.v1%22 in Ziti Edge Controller. Status code: 401 Unauthorized, Server returned: {
    "error": {
        "code": "UNAUTHORIZED",
        "message": "The request could not be completed. The session is not authorized or the credentials are invalid",
        "requestId": "7zxWCy7Vx"
    },
    "meta": {
        "apiEnrollmentVersion": "0.0.1",
        "apiVersion": "0.0.1"
    }
}
3.2.2 Router
Follow the Router guide to setup a "Router with link listener and tunneler". We will name this router: JAMES-ER-SF
3.2.2.1 ZAC
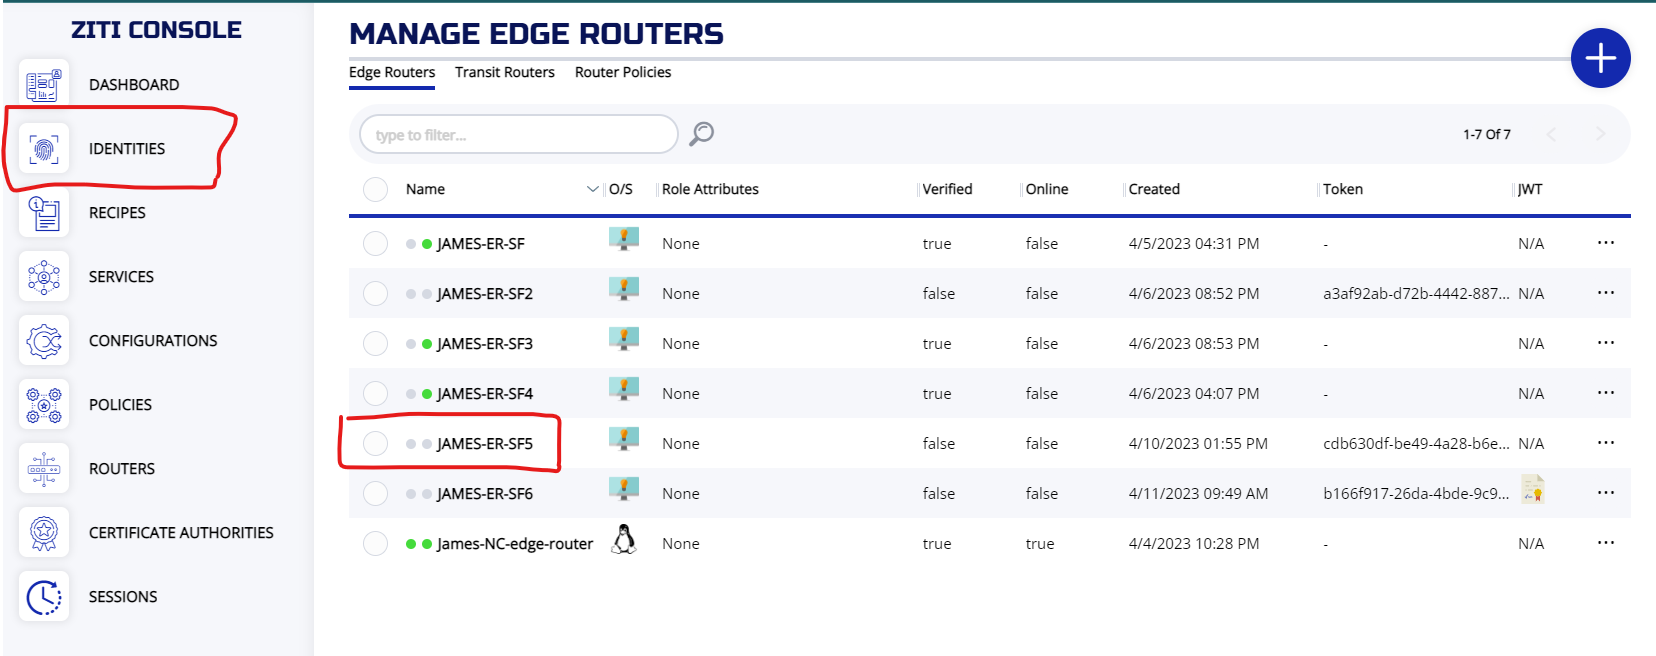
On the ZAC ROUTERS screen, you can check your router and make sure it is created correctly. You can also check the identity associated with the router by clicked on IDENTITIES
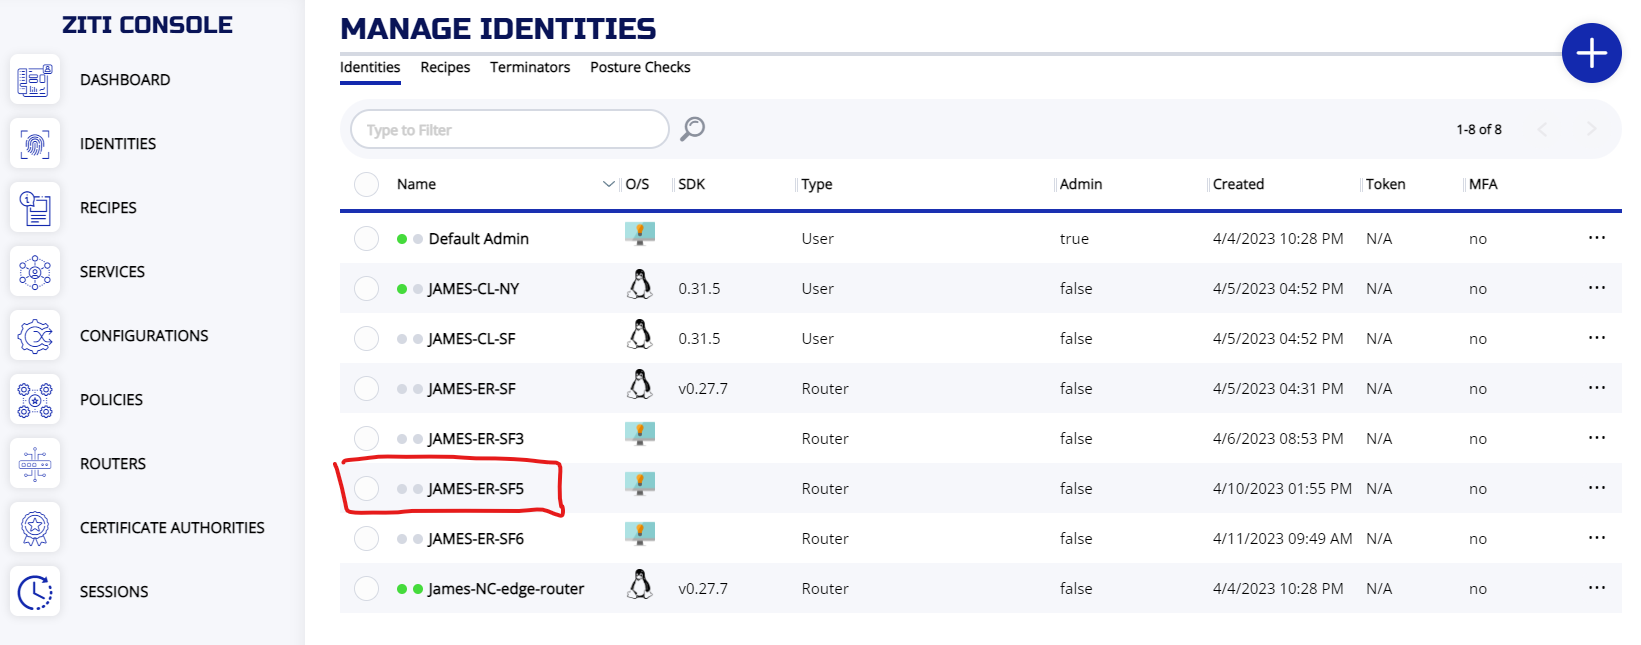
On the IDENTITIES screen, you will see an identity match your router name.
3.2.2.2 CLI
Once the router is create, you can check the controller to make sure the router is created correctly.
You should see an router named JAMES-ER-SF
# ziti edge list edge-routers
╭────────────┬──────────────────────┬────────┬───────────────┬──────┬────────────╮
│ ID         │ NAME                 │ ONLINE │ ALLOW TRANSIT │ COST │ ATTRIBUTES │
├────────────┼──────────────────────┼────────┼───────────────┼──────┼────────────┤
│ 2hWwOcTaR  │ James-NC-edge-router │ true   │ true          │    0 │ public     │
│ xTP5-y7VxP │ JAMES-ER-SF          │ false  │ true          │    0 │            │
╰────────────┴──────────────────────┴────────┴───────────────┴──────┴────────────╯
results: 1-2 of 2
You should also see an identity named JAMES-ER-SF
# ziti edge list identities
╭────────────┬──────────────────────┬────────┬────────────╮
│ ID         │ NAME                 │ TYPE   │ ATTRIBUTES │
├────────────┼──────────────────────┼────────┼────────────┤
│ 2hWwOcTaR  │ James-NC-edge-router │ Router │            │
│ bhNbEYGrM  │ Default Admin        │ User   │            │
│ xTP5-y7VxP │ JAMES-ER-SF          │ Router │            │
╰────────────┴──────────────────────┴────────┴────────────╯
results: 1-3 of 3
Since we created this router as link listener, you should also check the link listener function is correctly setup. Check the router on fabric to make sure it has listeners displayed for the router you created.
# ziti fabric list routers
╭────────────┬──────────────────────┬────────┬──────┬──────────────┬──────────┬────────────────────────┬─────────────────────────────╮
│ ID         │ NAME                 │ ONLINE │ COST │ NO TRAVERSAL │ DISABLED │ VERSION                │ LISTENERS                   │
├────────────┼──────────────────────┼────────┼──────┼──────────────┼──────────┼────────────────────────┼─────────────────────────────┤
│ 2hWwOcTaR  │ James-NC-edge-router │ true   │    0 │ false        │ false    │ v0.27.7 on linux/amd64 │ 1: tls:161.35.108.218:10080 │
│ xTP5-y7VxP │ JAMES-ER-SF          │ true   │    0 │ false        │ false    │ v0.27.7 on linux/amd64 │ 1: tls:146.190.120.86:80    │
╰────────────┴──────────────────────┴────────┴──────┴──────────────┴──────────┴────────────────────────┴─────────────────────────────╯
results: 1-2 of 2
3.2.3 Tunnelers/Identities
We need two tunnelers for our testing. Please follow controller guide section of "Create VM on Digital Ocean" to create two VMs running Ubuntu 22.04.
3.2.3.1 Create Identity with ZAC
To create Identities on ZAC, go to the Identities screen, and press + icon. On the CREATE IDENTITY widget, enter the NAME of the identity (Required and has to be unique). Leave the IDENTITY TYPE as "Device". Leave the ENROLLMENT TYPE as "One Time Token". Fill in other optional fields and press SAVE.
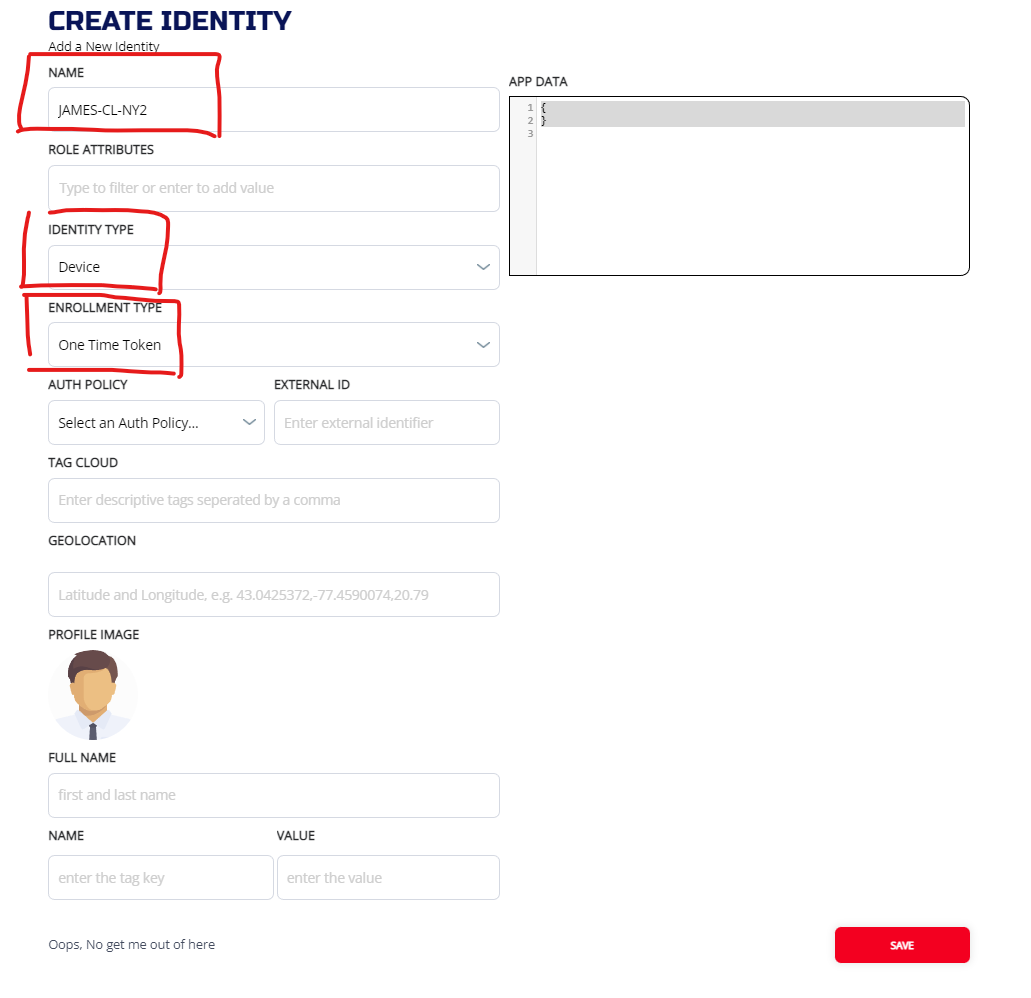
Once the identity is created, you can check your identity and download the JWT from the MANAGE IDENTITIES screen
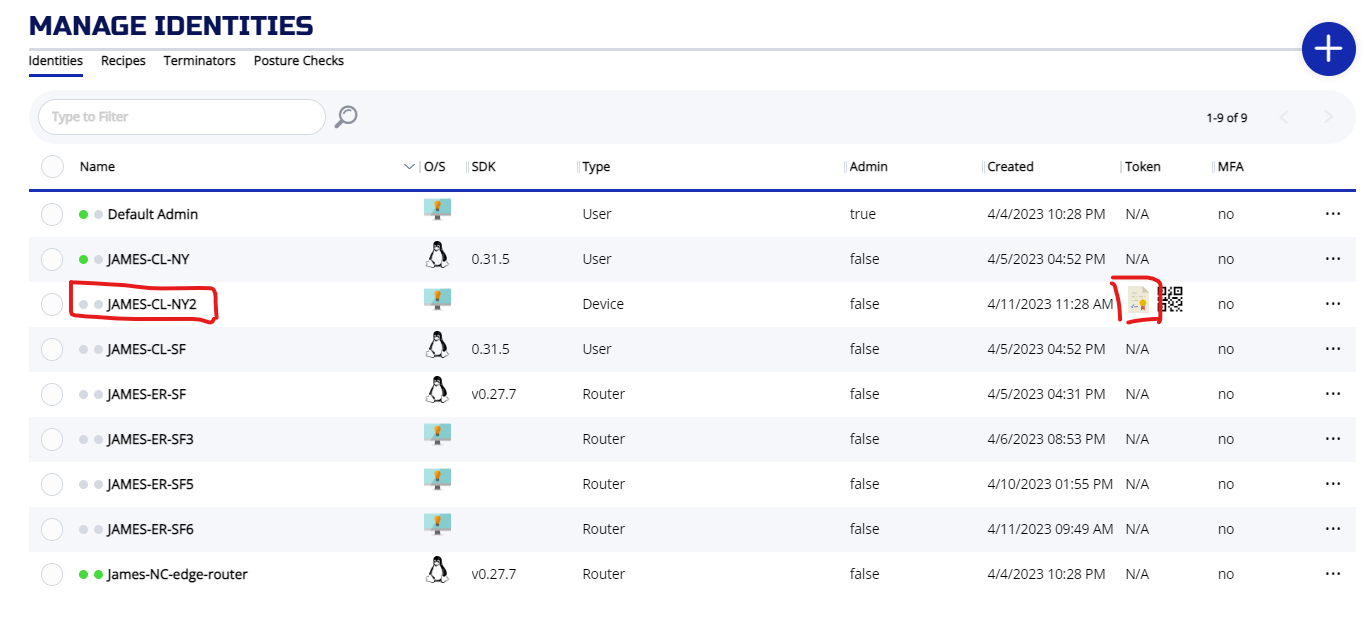
Create two identities before you continue.
3.2.3.2 Create Identity with CLI
Create two identities (JAMES-CL-NY, JAMES-CL-SF) on the controller:
ziti edge create identity user JAMES-CL-NY -o JAMES-CL-NY.jwt
ziti edge create identity user JAMES-CL-SF -o JAMES-CL-SF.jwt
3.2.3.3 Register Identities
Login to your VMs created earlier, follow Install Linux Package Ubuntu Jammy 22.04 section to install and register your ziti-edge-tunnel.
After the tunnel is registered, check the status and make sure it is running
# systemctl status ziti-edge-tunnel
● ziti-edge-tunnel.service - Ziti Edge Tunnel
     Loaded: loaded (/etc/systemd/system/ziti-edge-tunnel.service; enabled; vendor preset: enabled)
     Active: active (running) since Wed 2023-04-05 20:57:04 UTC; 1min 41s ago
    Process: 2640 ExecStartPre=/opt/openziti/bin/ziti-edge-tunnel.sh (code=exited, status=0/SUCCESS)
   Main PID: 2641 (ziti-edge-tunne)
      Tasks: 5 (limit: 2323)
     Memory: 6.5M
        CPU: 752ms
     CGroup: /system.slice/ziti-edge-tunnel.service
             └─2641 /opt/openziti/bin/ziti-edge-tunnel run --verbose=2 --dns-ip-range=100.64.0.1/10 --identity-dir=/opt/openziti/etc/identities
3.2.3.4 Gather info of the VMs
After you registered both tunnelers, write down the local IP and subnet of these VMs, we will be using the local IP to test our traffics.
JAMES-ER-SF: 10.124.0.2/20
JAMES-CL-SF: 10.124.0.3/20
JAMES-CL-NY: 10.136.219.136/16
3.3 Create Edge Router Policy
By default, the system created an edge router policy to bind all identities to any routers tag with #public attribute. So, we need to add #public to our router (JAMES-ER-SF).
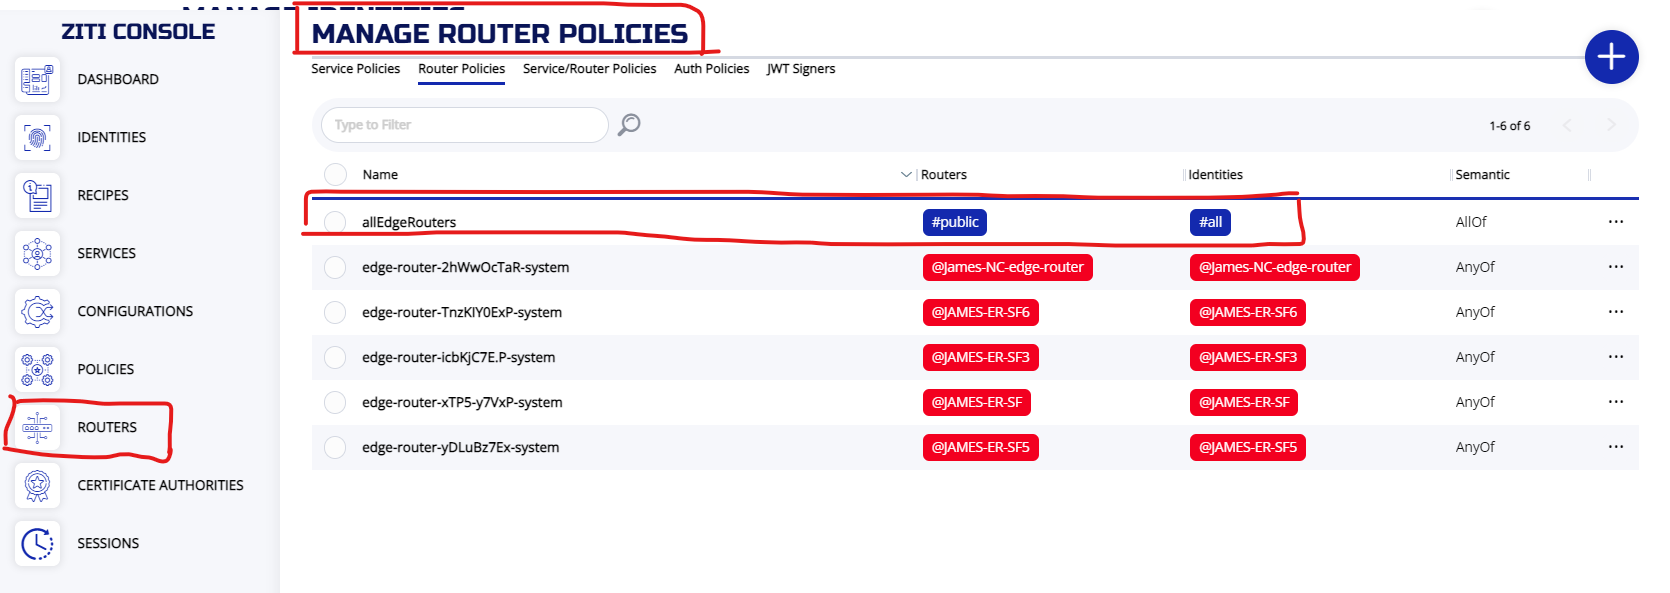
3.3.1 ZAC
From the ROUTERS screen, you can choose Router Policies to display the edge router policies. As you can see, the default policy is already in place.
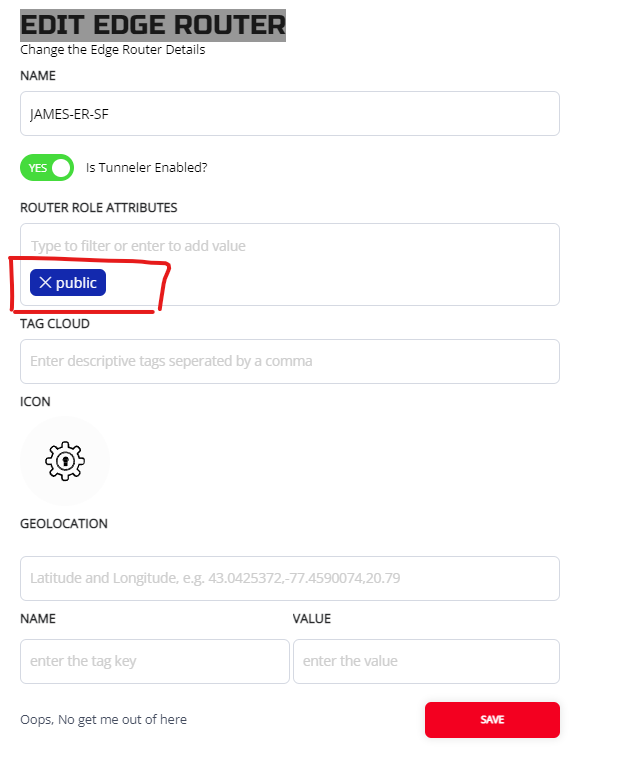
To add attribute "public" to the router, choose your router from the ROUTERS screen, click on ... and choose Edit
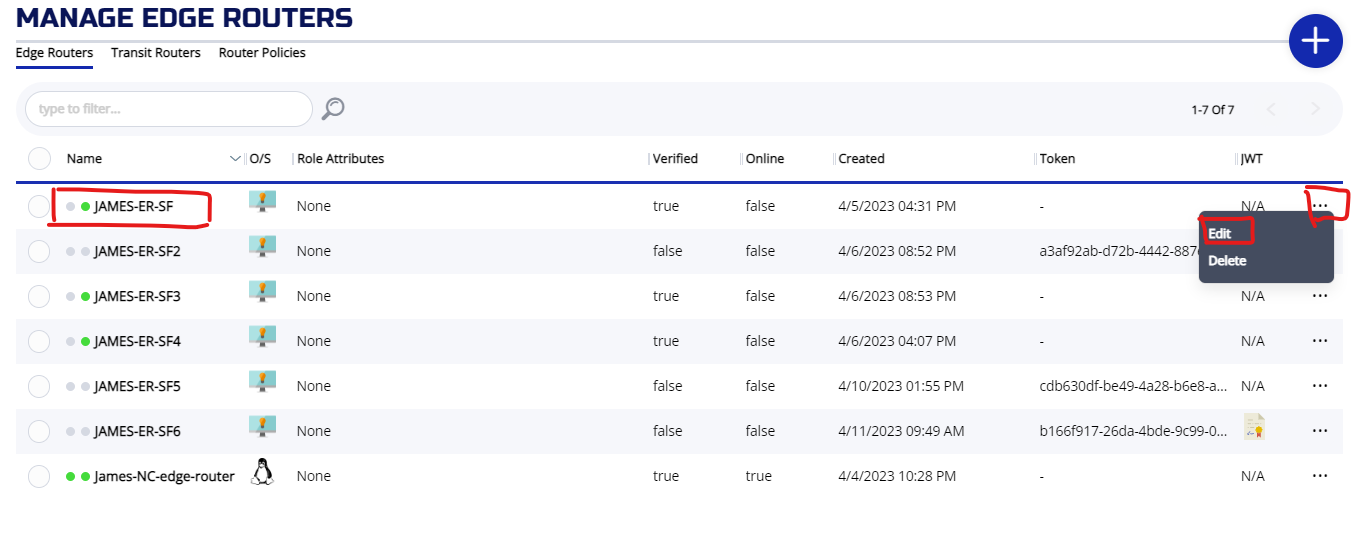
On the EDIT EDGE ROUTER screen, you can add public attribute and then press SAVE
3.3.2 CLI
On the controller:
check the edge router policy
# ziti edge list edge-router-policies
╭────────────────────────┬───────────────────────────────┬───────────────────────┬───────────────────────╮
│ ID                     │ NAME                          │ EDGE ROUTER ROLES     │ IDENTITY ROLES        │
├────────────────────────┼───────────────────────────────┼───────────────────────┼───────────────────────┤
│ 2my8BX4UTsdnNtH5jInLH2 │ allEdgeRouters                │ #public               │ #all                  │
╰────────────────────────┴───────────────────────────────┴───────────────────────┴───────────────────────╯
check the edge router attribute
# ziti edge list edge-routers
╭────────────┬──────────────────────┬────────┬───────────────┬──────┬────────────╮
│ ID         │ NAME                 │ ONLINE │ ALLOW TRANSIT │ COST │ ATTRIBUTES │
├────────────┼──────────────────────┼────────┼───────────────┼──────┼────────────┤
│ 2hWwOcTaR  │ James-NC-edge-router │ true   │ true          │    0 │ public     │
│ xTP5-y7VxP │ JAMES-ER-SF          │ true   │ true          │    0 │            │
╰────────────┴──────────────────────┴────────┴───────────────┴──────┴────────────╯
Add "public" attribute to our router:
# ziti edge update edge-router JAMES-ER-SF -a "public"
# ziti edge list edge-routers
╭────────────┬──────────────────────┬────────┬───────────────┬──────┬────────────╮
│ ID         │ NAME                 │ ONLINE │ ALLOW TRANSIT │ COST │ ATTRIBUTES │
├────────────┼──────────────────────┼────────┼───────────────┼──────┼────────────┤
│ 2hWwOcTaR  │ James-NC-edge-router │ true   │ true          │    0 │ public     │
│ xTP5-y7VxP │ JAMES-ER-SF          │ true   │ true          │    0 │ public     │
╰────────────┴──────────────────────┴────────┴───────────────┴──────┴────────────╯
results: 1-2 of 2
3.4 Setup Tunnel to Tunnel ssh connection
In this section, we will be showing how to configure ziti to establish ssh service via our network. We will be using a pseudo dns name (t2tssh.ziti) to establish this connection. The intercept side (ingress) will be JAMES-CL-SF, the server side (egress) will be JAMES-CL-NY.
For CLI procedures, all commands are done on the controller
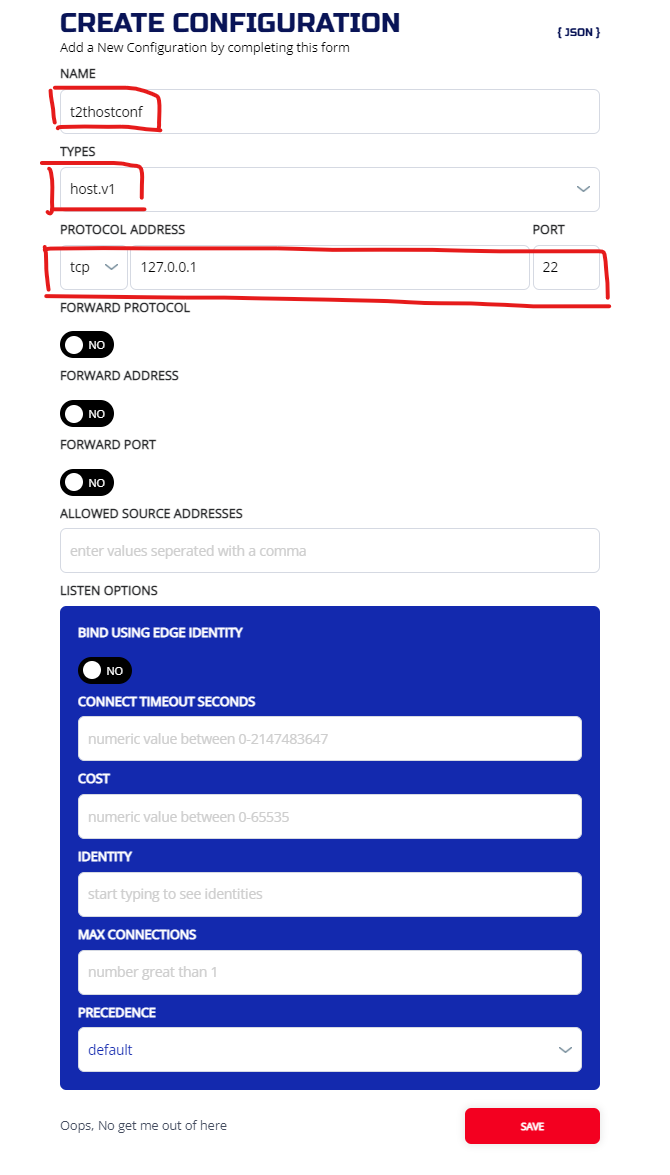
3.4.1 Create a host.v1 config
This config is used instruct the server-side tunneler how to offload the traffic from the overlay, back to the underlay. We are dropping the traffic off our loopback interface, so we use the address "127.0.0.1“
3.4.1.1 ZAC
Create the configuration from MANAGE CONFIGURATIONS screen.
3.4.1.2 CLI
ziti edge create config t2thostconf host.v1 '{"protocol":"tcp", "address":"127.0.0.1", "port":22}'
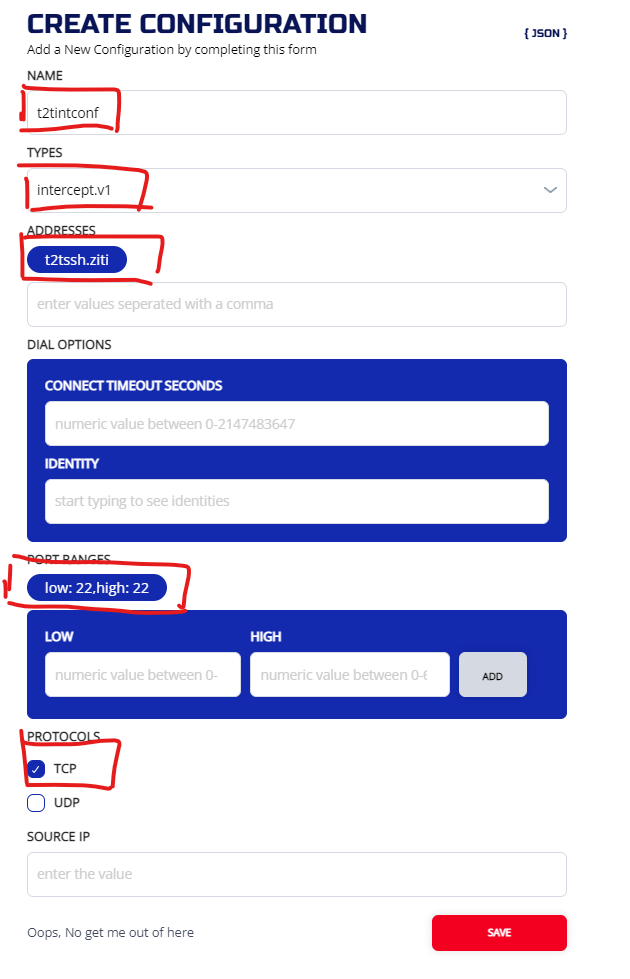
3.4.2 Create an intercept.v1 config
This config is used to instruct the intercept-side tunneler how to correctly intercept the targeted traffic and put it onto the overlay. We are setting up intercept on dns name "t2tssh.ziti"
3.4.2.1 ZAC
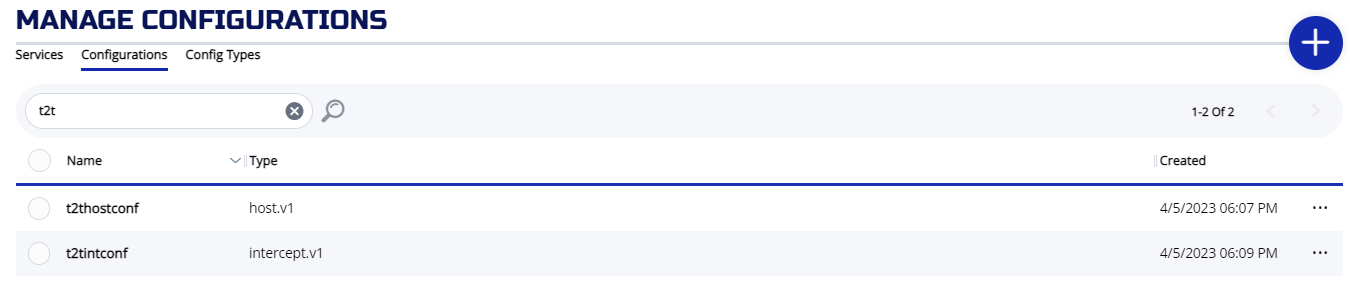
Check the provisioned configs on the configuration screen:
3.4.2.2 CLI
ziti edge create config t2tintconf intercept.v1 '{"protocols": ["tcp"], "addresses": ["t2tssh.ziti"], "portRanges": [{"low": 22, "high": 22}]}'
If the command finished successfully, you will see two configs:
# ziti edge list configs
╭────────────────────────┬─────────────┬──────────────╮
│ ID                     │ NAME        │ CONFIG TYPE  │
├────────────────────────┼─────────────┼──────────────┤
│ 1R9iDpU7OvREH6LNxQapPO │ t2tintconf  │ intercept.v1 │
│ gIeZ1KgilGXzkY4RxDF2f  │ t2thostconf │ host.v1      │
╰────────────────────────┴─────────────┴──────────────╯
results: 1-2 of 2
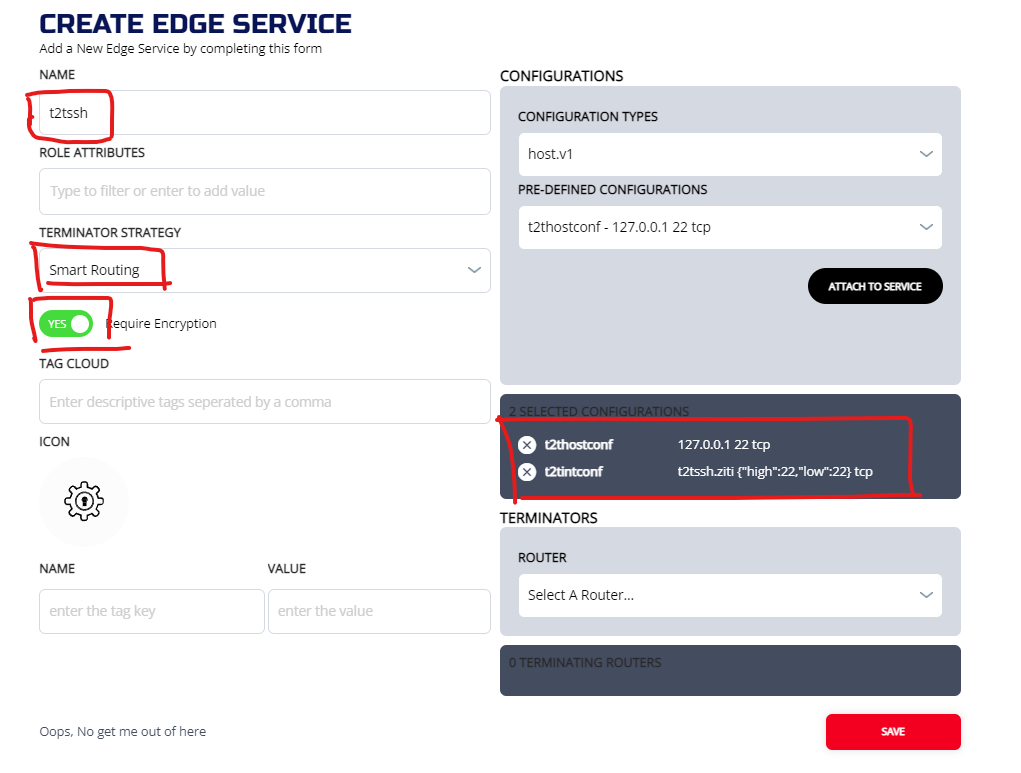
3.4.3 Create Service
Now we need to put these two configs into a service. We going to name the service "t2tssh":
3.4.3.1 ZAC
Create service from Services menu from MANAGE EDGE SERVICES screen.
3.4.3.2 CLI
ziti edge create service t2tssh -c t2tintconf,t2thostconf
Check Service
# ziti edge list services
╭───────────────────────┬────────┬────────────┬─────────────────────┬────────────╮
│ ID                    │ NAME   │ ENCRYPTION │ TERMINATOR STRATEGY │ ATTRIBUTES │
│                       │        │  REQUIRED  │                     │            │
├───────────────────────┼────────┼────────────┼─────────────────────┼────────────┤
│ CZJi5tDxTk8C8XymCbu7f │ t2tssh │ true       │ smartrouting        │            │
╰───────────────────────┴────────┴────────────┴─────────────────────┴────────────╯
results: 1-1 of 1
Please note, the Encryption = true and smartrouting are default setting.
3.4.4 Create Bind Service policy
Now we need to specify which tunneler (in our case, JAMES-CL-NY)is going to host the service by setting up a bind service policy
3.4.4.1 ZAC
Create a service policy from MANAGE SERVICE POLICIES screen:
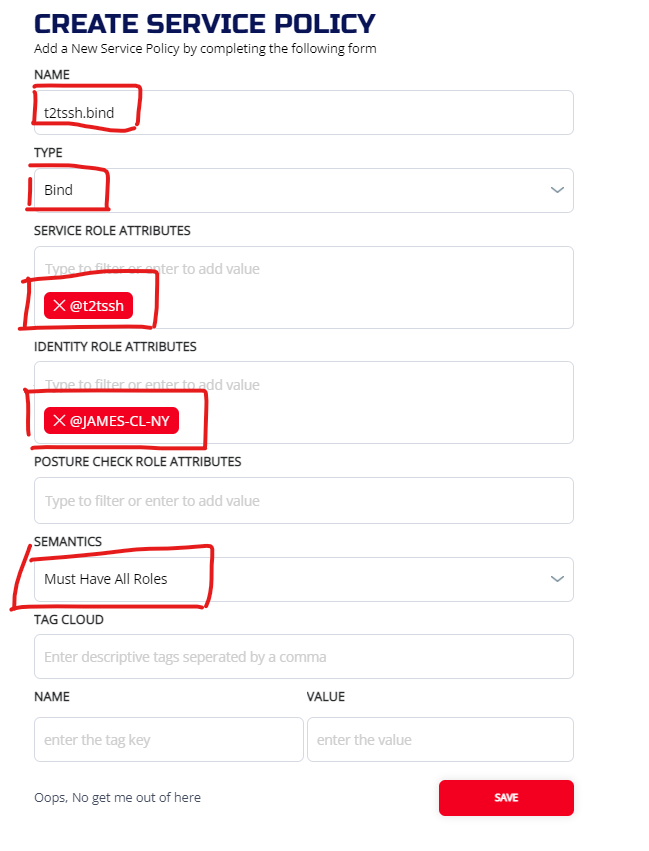
3.4.4.2 CLI
ziti edge create service-policy t2tssh.bind Bind --service-roles '@t2tssh' --identity-roles "@JAMES-CL-NY"
3.4.5 Create Dial Service policy
Now we need to specify the intercept side tunneler (JAMES-CL-SF) for the service by setting up a dial service policy
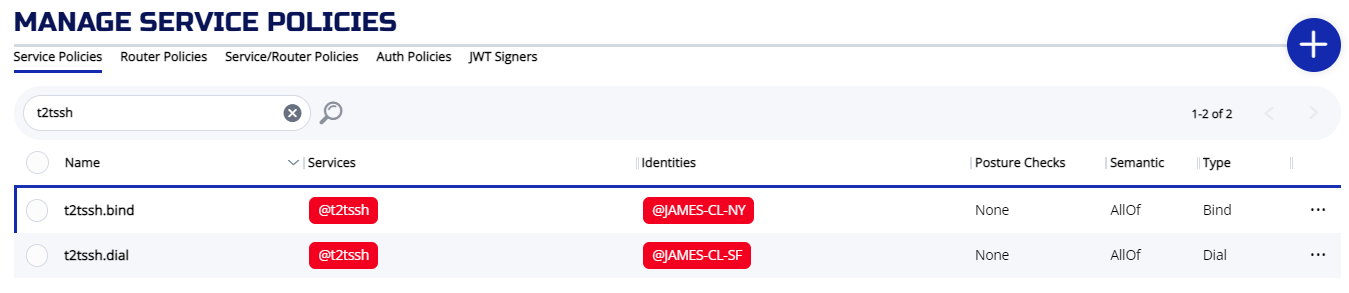
3.4.5.1 ZAC
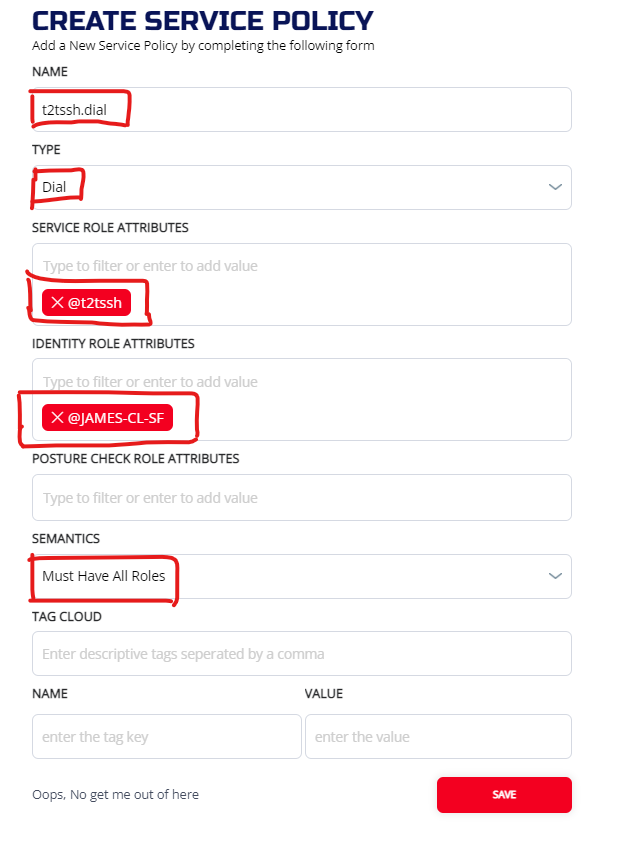
We should have two service policies created. The services name should match on two policies. One policy is Bind and the other ons is Dial. They should be set to different identities.
3.4.5.2 CLI
ziti edge create service-policy t2tssh.dial Dial --service-roles '@t2tssh' --identity-roles "@JAMES-CL-SF"
Make sure both policies are setup correctly:
# ziti edge list service-policies
╭────────────────────────┬─────────────┬──────────┬───────────────┬────────────────┬─────────────────────╮
│ ID                     │ NAME        │ SEMANTIC │ SERVICE ROLES │ IDENTITY ROLES │ POSTURE CHECK ROLES │
├────────────────────────┼─────────────┼──────────┼───────────────┼────────────────┼─────────────────────┤
│ 3h25stJwThctE1AAJRGVwP │ t2tssh.bind │ AllOf    │ @t2tssh       │ @JAMES-CL-NY   │                     │
│ 5eSuYfv381U3qNs3vYbqpU │ t2tssh.dial │ AllOf    │ @t2tssh       │ @JAMES-CL-SF   │                     │
╰────────────────────────┴─────────────┴──────────┴───────────────┴────────────────┴─────────────────────╯
results: 1-2 of 2
You should also make sure the policy advisor display correctly:
# ziti edge policy-advisor services |grep t2tssh
OKAY : JAMES-CL-NY (2) -> t2tssh (2) Common Routers: (2/2) Dial: N Bind: Y
OKAY : JAMES-CL-SF (2) -> t2tssh (2) Common Routers: (2/2) Dial: Y Bind: N
Make sure there is a "Dial" line and a "Bind" line. They are both "OKAY" and has at least 1 Common Routers.
3.4.6 Verify the connection
Login to the intercept side tunneler (JAMES-CL-SF) node, you should be able to ssh to the server (JAMES-CL-NY) by using dns name "t2tssh.ziti"
root@JAMES-CL-SF:~# ssh t2tssh.ziti
Welcome to Ubuntu 22.04.2 LTS (GNU/Linux 5.15.0-67-generic x86_64)

 * Documentation:  https://help.ubuntu.com
 * Management:     https://landscape.canonical.com
 * Support:        https://ubuntu.com/advantage

  System information as of Wed Apr  5 22:35:36 UTC 2023

  System load:  0.009765625       Users logged in:       1
  Usage of /:   3.4% of 48.27GB   IPv4 address for eth0: 104.248.116.185
  Memory usage: 11%               IPv4 address for eth0: 10.10.0.6
  Swap usage:   0%                IPv4 address for eth1: 10.136.219.136
  Processes:    94                IPv4 address for tun0: 100.64.0.1

 * Introducing Expanded Security Maintenance for Applications.
   Receive updates to over 25,000 software packages with your
   Ubuntu Pro subscription. Free for personal use.

     https://ubuntu.com/pro

Expanded Security Maintenance for Applications is not enabled.

28 updates can be applied immediately.
21 of these updates are standard security updates.
To see these additional updates run: apt list --upgradable

Enable ESM Apps to receive additional future security updates.
See https://ubuntu.com/esm or run: sudo pro status


Last login: Wed Apr  5 20:45:18 2023 from 45.17.199.35
root@JAMES-CL-NY:~# <ctrl-d>
logout
Connection to t2tssh.ziti closed.
root@JAMES-CL-SF:~#
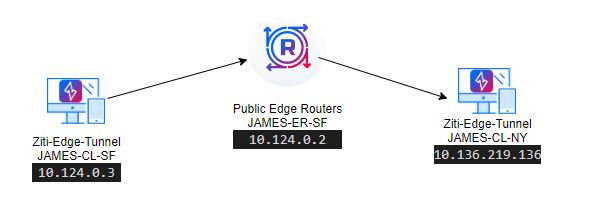
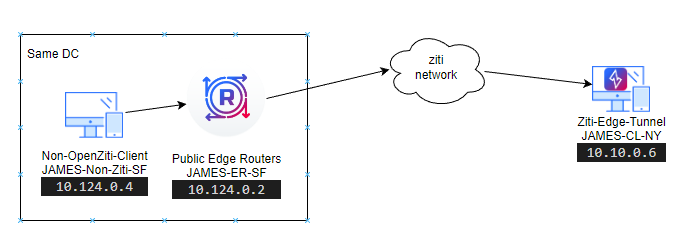
3.5 Setup Tunnel to ERT http connection
Edge Router Tunnel (ERT) has combine router and tunneler function. In this section, we will demonstrate a connection between a Ziti-Edge-Tunnel (JAMES-CL-NY) to a ERT (JAMES-ER-SF)
The procedure is similar to tunnel to tunnel service, so please refer to that section for detail explanation of each step.
3.5.1 Create a host.v1 config
3.5.1.1 ZAC
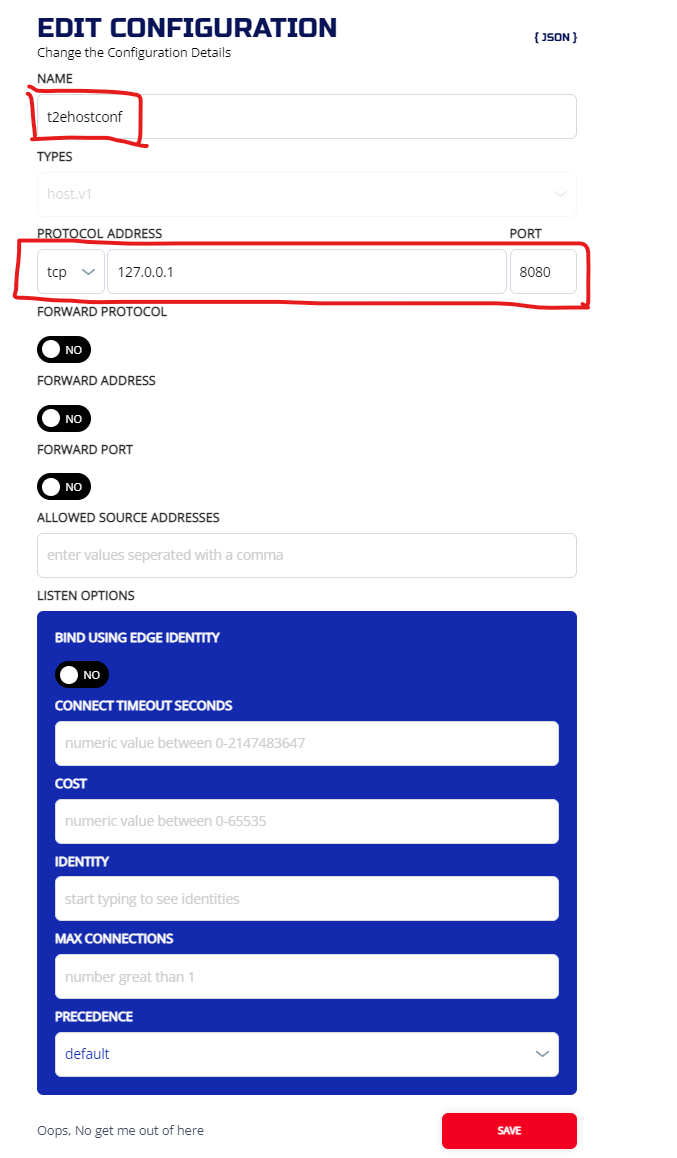
3.5.1.2 CLI
ziti edge create config t2ehostconf host.v1 '{"protocol":"tcp", "address":"127.0.0.1", "port":8080}'
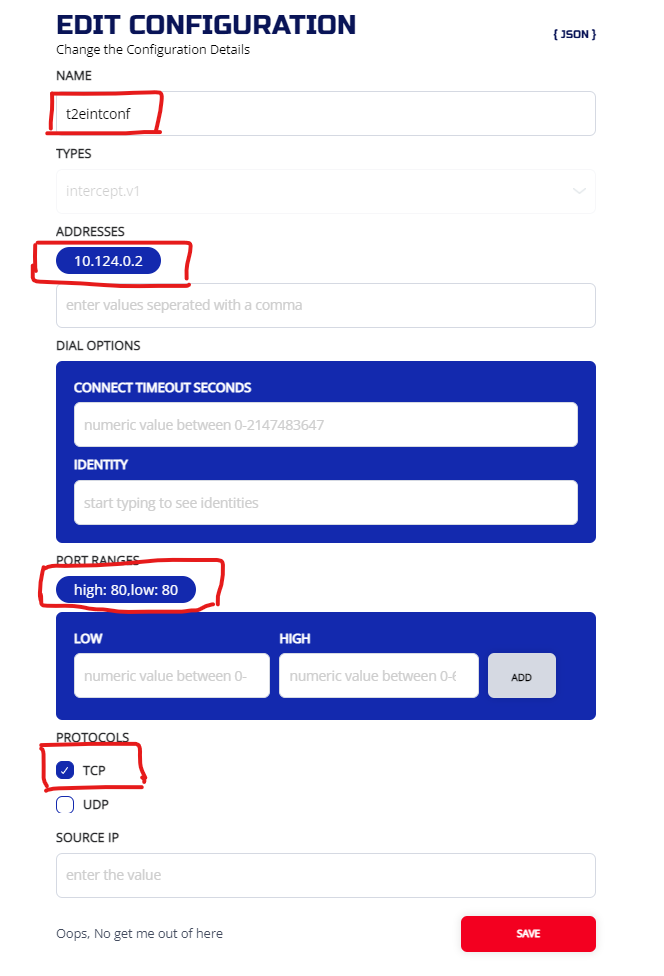
3.5.2 Create an intercept.v1 config
Use destination local ip (10.124.0.2) as intercept address
3.5.2.1 ZAC
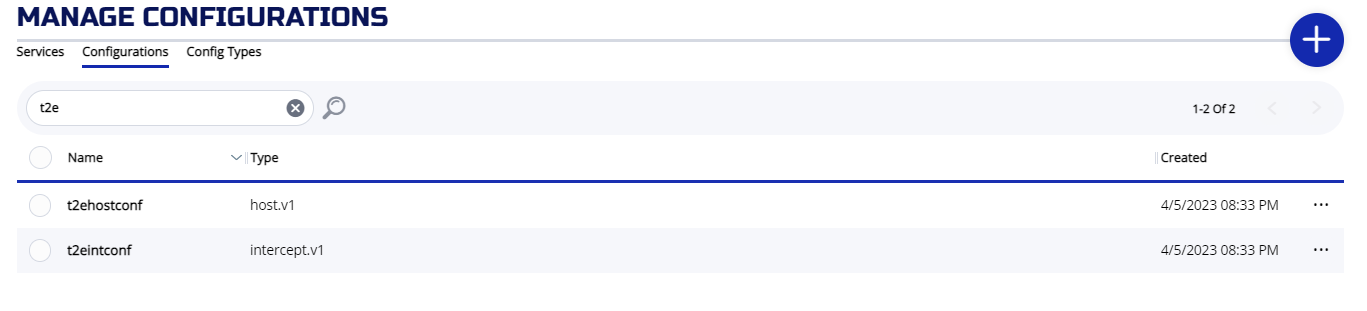
And you should have two configs:
3.5.2.2 CLI
ziti edge create config t2eintconf intercept.v1 '{"protocols": ["tcp"], "addresses": ["10.124.0.2"], "portRanges": [{"low": 80, "high": 80}]}'
# ziti edge list configs |grep t2e
│ IlgnlM2srnU7s8C3hiLJA  │ t2eintconf  │ intercept.v1 │
│ uJUtyXI5XH1wSsSCiCARp  │ t2ehostconf │ host.v1      │
3.5.3 Create Service
Now we need to put these two configs into a service. We going to name the service "t2ehttp":
3.5.3.1 ZAC
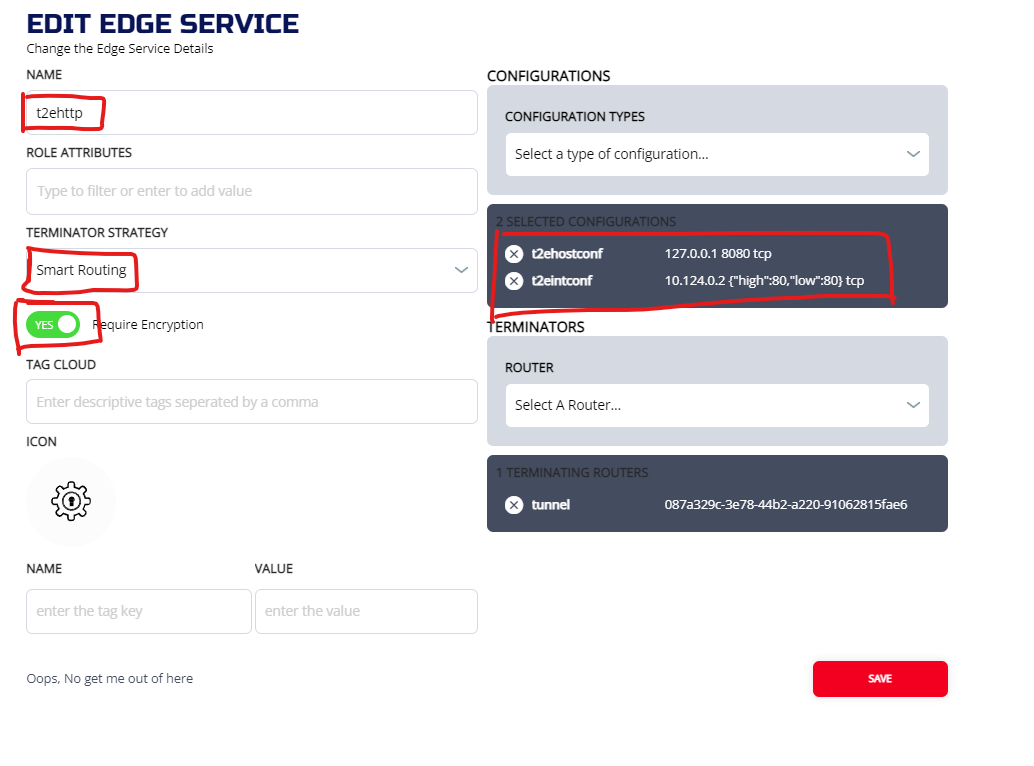
3.5.3.2 CLI
ziti edge create service t2ehttp -c t2eintconf,t2ehostconf
Check Service
# ziti edge list services |grep t2e
│ 5FI8Aw0IQ7xaUMgH2rKvps │ t2ehttp │ true       │ smartrouting        │            │
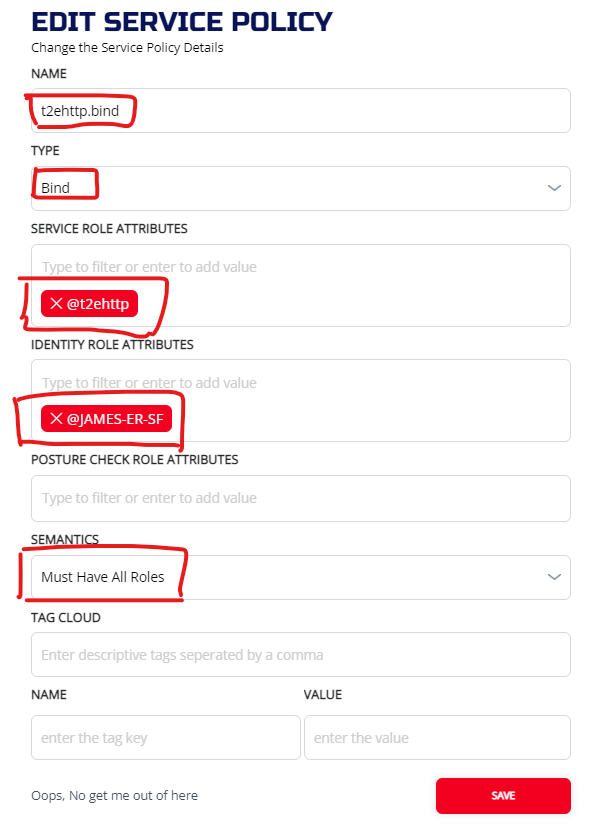
3.5.4 Create Bind Service policy
3.5.4.1 ZAC
3.5.4.2 CLI
ziti edge create service-policy t2ehttp.bind Bind --service-roles '@t2ehttp' --identity-roles "@JAMES-ER-SF"
3.5.5 Create Dial Service policy
Now we need to specify the intercept side tunneler (JAMES-CL-NY) for the service by setting up a dial service policy
3.5.5.1 ZAC

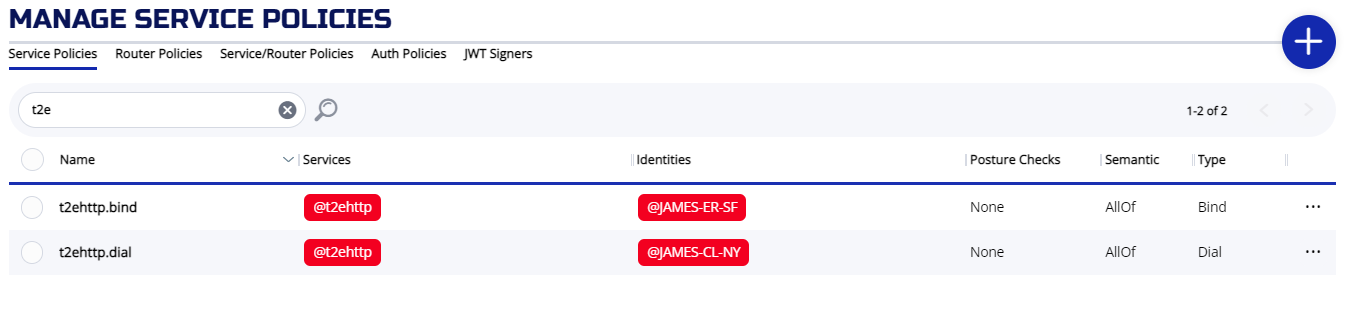
Check two service polices:
3.5.5.2 CLI
ziti edge create service-policy t2ehttp.dial Dial --service-roles '@t2ehttp' --identity-roles "@JAMES-CL-NY"
Make sure both policies are setup correctly:
# ziti edge list service-policies |grep t2e
│ 1UFHo2XRniIuORXKJaXDIZ │ t2ehttp.bind │ AllOf    │ @t2ehttp      │ @JAMES-ER-SF   │                     │
│ 3jgxqoRp9g4axj6MM986Dt │ t2ehttp.dial │ AllOf    │ @t2ehttp      │ @JAMES-CL-NY   │                     │
You should also make sure the policy advisor display correctly:
# ziti edge policy-advisor services |grep t2ehttp
OKAY : JAMES-CL-NY (2) -> t2ehttp (2) Common Routers: (2/2) Dial: Y Bind: N
OKAY : JAMES-ER-SF (2) -> t2ehttp (2) Common Routers: (2/2) Dial: N Bind: Y
Make sure there is a "Dial" line and a "Bind" line. They are both "OKAY" and has at least 1 Common Routers.
3.5.6 Verify the connection
Login to the router (JAMES-ER-SF), setup a file to send via http.
root@JAMES-ER-SF:~# cat >hello.txt
This is file from Edge Router in San Francisco.
<ctrl-d>
root@JAMES-ER-SF:~# python3 -m http.server 8080
Serving HTTP on 0.0.0.0 port 8080 (http://0.0.0.0:8080/) ...
Login to the intercept side tunneler (JAMES-CL-NY) node.
root@JAMES-CL-NY:~# curl http://10.124.0.2/hello.txt
This is file from Edge Router in San Francisco.
root@JAMES-CL-NY:~#
3.5.7 Conclusion
In section, we demonstrated intercepting http (port 80) request to an IP address and forward the request to a remote http server listening to port 8080 via ziti network.
3.6 Setup Connection from a non-OpenZiti client
3.6.1 Introduction
In this section, we will demonstrate how to setup non-OpenZiti client to use the ziti service. The following conditions need to be met in order for this connection to work correctly:
- The non-OpenZiti client has to be in the same data center as the edge router.
- The edge router is created with tunneler enabled.
We are also need to do the following to successfully demonstrate the connection:
- Create host and intercept config
- Create service
- Create dial and bind policy
- Setup route on the non-OpenZiti client
We will create an intercept at 11.11.11.11:80, and drop off at local IP (10.10.0.6) **JAMES-CL-NY" port (80).
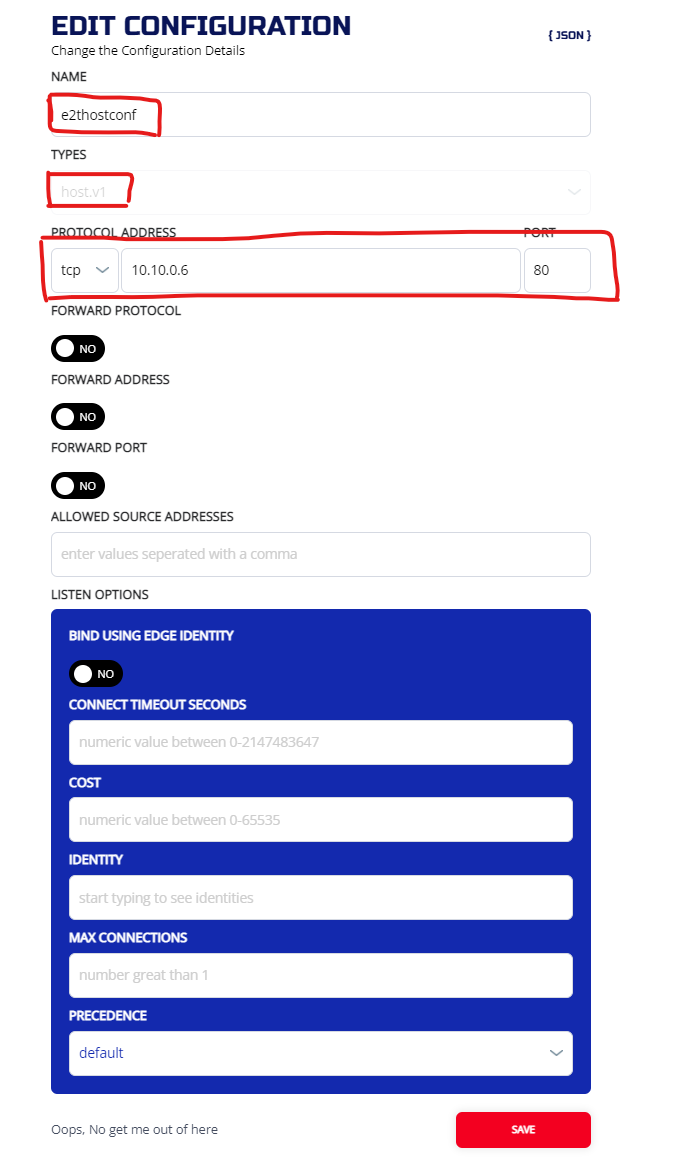
3.6.2 Create a host.v1 config
Used address 10.10.0.6 as host side destination, and port 80 as destination port.
3.6.2.1 ZAC
3.6.2.2 CLI
ziti edge create config e2thostconf host.v1 '{"protocol":"tcp", "address":"10.10.0.6", "port":80}'
3.6.3 Create an intercept.v1 config
Use a pseudo ip (11.11.11.11) as intercept address
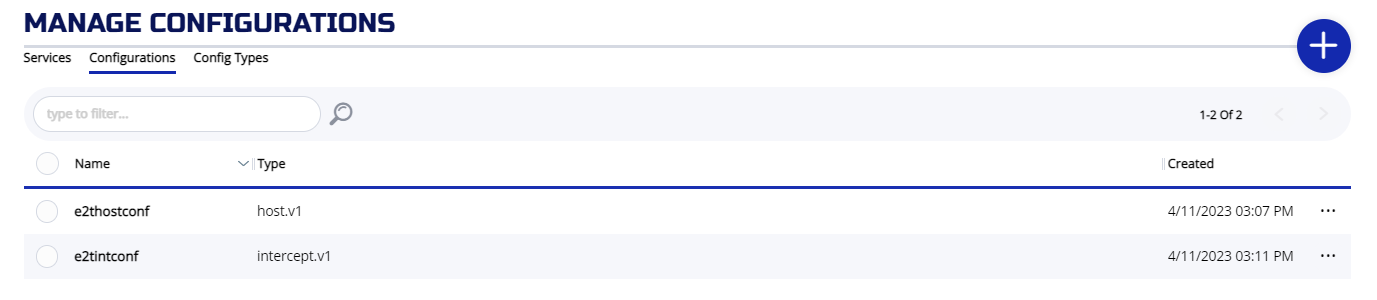
3.6.3.1 ZAC
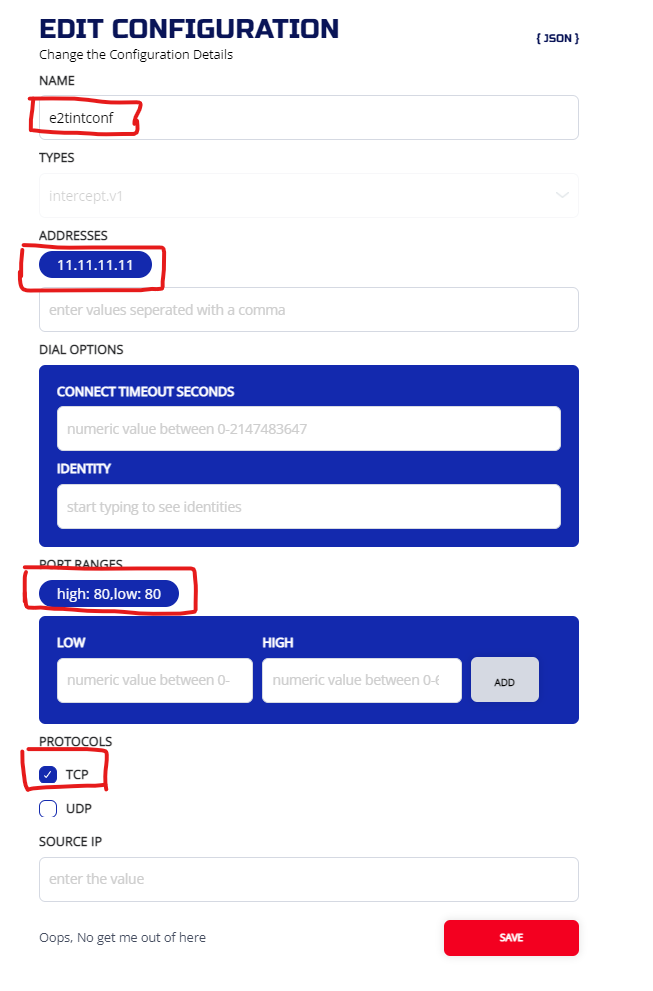
And you should have two configs:
3.6.3.2 CLI
ziti edge create config e2tintconf intercept.v1 '{"protocols": ["tcp"], "addresses": ["11.11.11.11"], "portRanges": [{"low": 80, "high": 80}]}'
# ziti edge list configs
╭────────────────────────┬─────────────┬──────────────╮
│ ID                     │ NAME        │ CONFIG TYPE  │
├────────────────────────┼─────────────┼──────────────┤
│ 2XPvCjPhQHSXi5xWXgprFy │ e2thostconf │ host.v1      │
│ 4GxliAfD7Ww1uEpyJeb9eF │ e2tintconf  │ intercept.v1 │
╰────────────────────────┴─────────────┴──────────────╯
results: 1-2 of 2
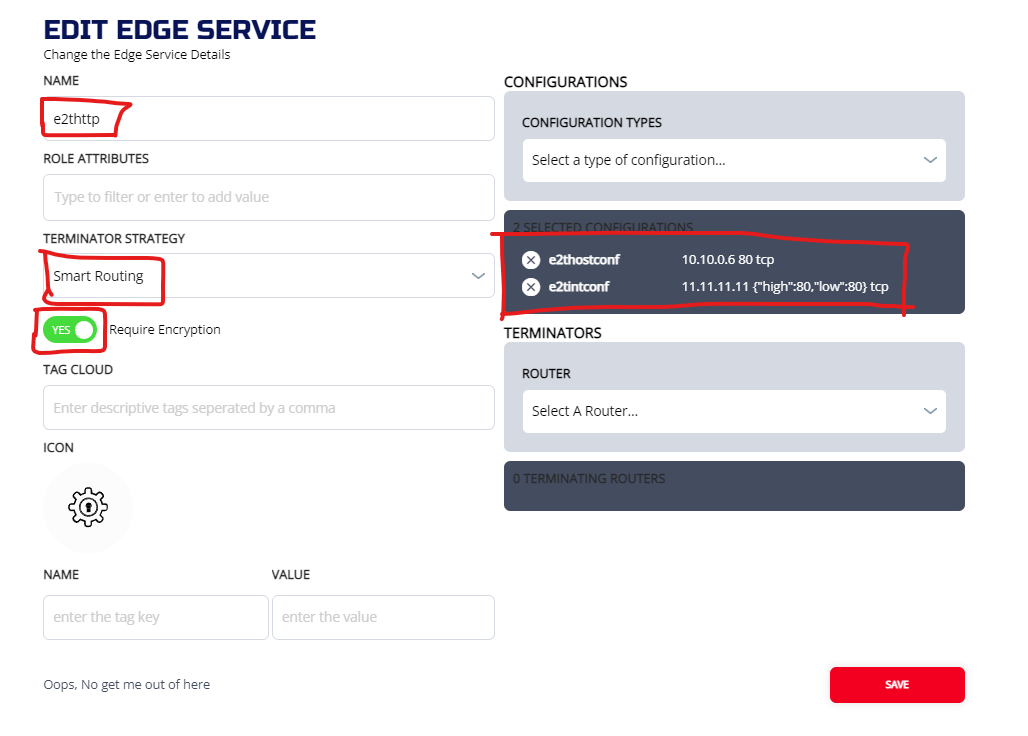
3.6.4 Create Service
Now we need to put these two configs into a service. We going to name the service "t2ehttp":
3.6.4.1 ZAC
3.6.4.2 CLI
ziti edge create service e2thttp -c e2thostconf,e2tintconf
Check Service
# ziti edge list services
╭────────────────────────┬─────────┬────────────┬─────────────────────┬────────────╮
│ ID                     │ NAME    │ ENCRYPTION │ TERMINATOR STRATEGY │ ATTRIBUTES │
│                        │         │  REQUIRED  │                     │            │
├────────────────────────┼─────────┼────────────┼─────────────────────┼────────────┤
│ 22Rxkf75JPYYgC2TYv6IHB │ e2thttp │ true       │ smartrouting        │            │
╰────────────────────────┴─────────┴────────────┴─────────────────────┴────────────╯
results: 1-1 of 1
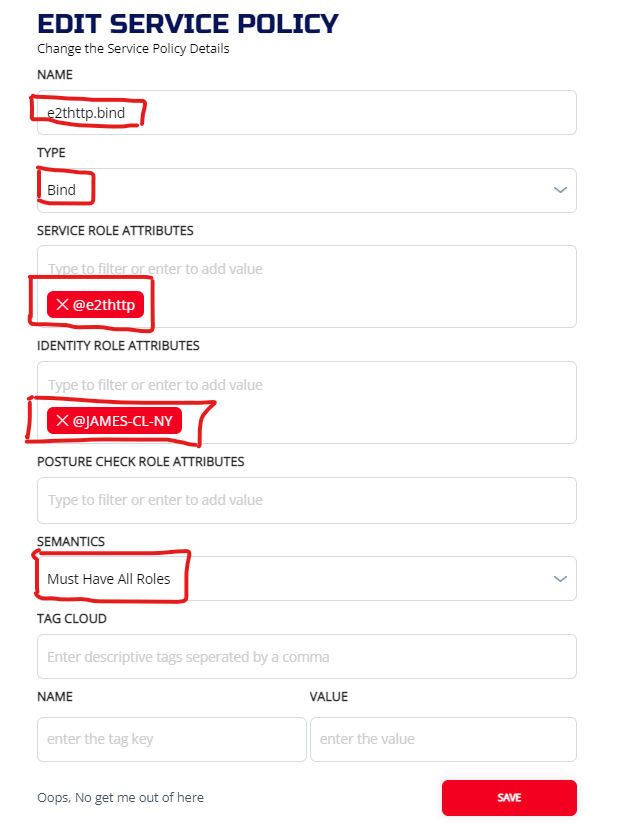
3.6.5 Create Bind Service policy
3.6.5.1 ZAC
3.6.5.2 CLI
ziti edge create service-policy e2thttp.bind Bind --service-roles '@e2thttp' --identity-roles "@JAMES-CL-NY"
3.6.6 Create Dial Service policy
Now we need to specify the intercept side tunneler (JAMES-ER-SF) for the service by setting up a dial service policy
3.6.6.1 ZAC
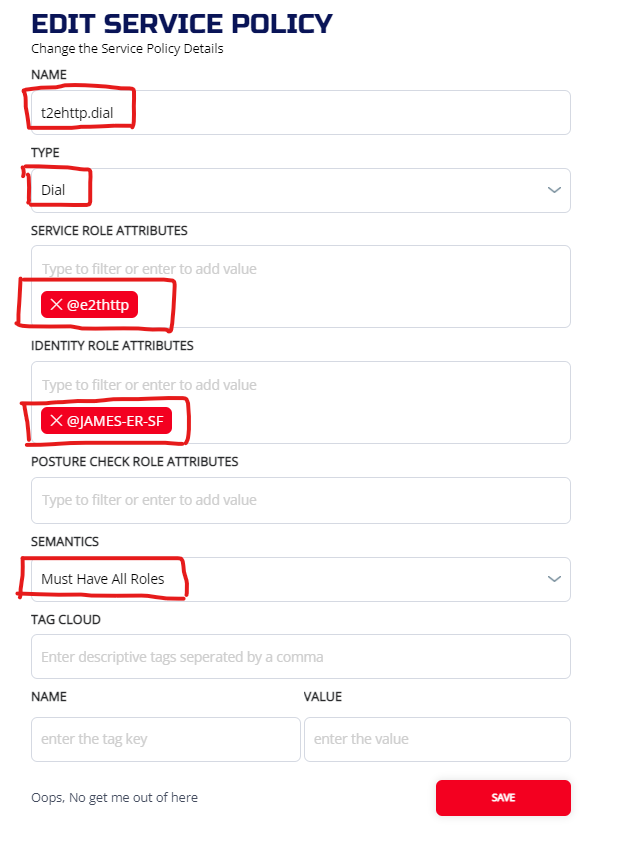
Check two service polices:
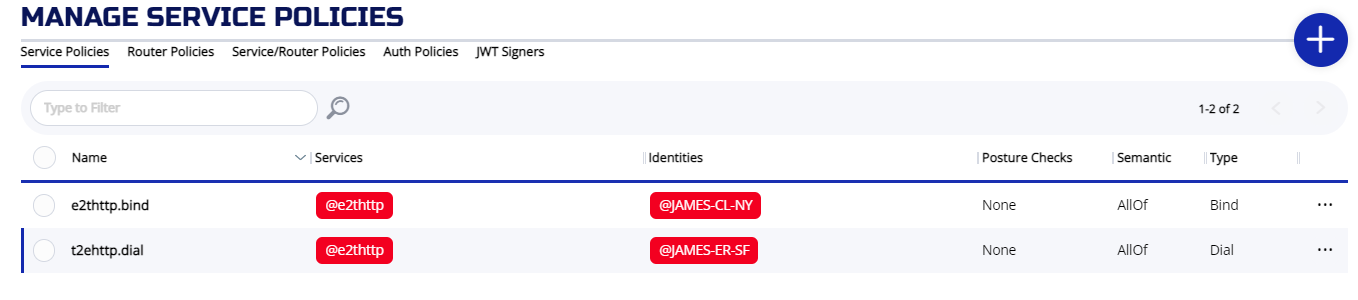
3.6.6.2 CLI
ziti edge create service-policy t2ehttp.dial Dial --service-roles '@e2thttp' --identity-roles "@JAMES-ER-SF"
Make sure both policies are setup correctly:
# ziti edge list service-policies
╭────────────────────────┬──────────────┬──────────┬───────────────┬────────────────┬─────────────────────╮
│ ID                     │ NAME         │ SEMANTIC │ SERVICE ROLES │ IDENTITY ROLES │ POSTURE CHECK ROLES │
├────────────────────────┼──────────────┼──────────┼───────────────┼────────────────┼─────────────────────┤
│ 3amYaaKuaRjbhYVnyp3E0U │ t2ehttp.dial │ AllOf    │ @e2thttp      │ @JAMES-ER-SF   │                     │
│ AAsWJvHALaz7hxeAHWBIX  │ e2thttp.bind │ AllOf    │ @e2thttp      │ @JAMES-CL-NY   │                     │
╰────────────────────────┴──────────────┴──────────┴───────────────┴────────────────┴─────────────────────╯
results: 1-2 of 2
You should also make sure the policy advisor display correctly:
# ziti edge policy-advisor services |grep e2thttp
OKAY : JAMES-CL-NY (2) -> e2thttp (2) Common Routers: (2/2) Dial: N Bind: Y
OKAY : JAMES-ER-SF (2) -> e2thttp (2) Common Routers: (2/2) Dial: Y Bind: N
Make sure there is a "Dial" line and a "Bind" line. They are both "OKAY" and has at least 1 Common Routers.
3.6.7 Verify the connection
Login to the Client (JAMES-CL-NY), setup a file to send via http.
root@JAMES-CL-NY:~# cat >hello.txt
This is file from Open-Ziti Client in Big Apple.
<ctrl-d>
root@JAMES-ER-SF:~# python3 -m http.server 80
Serving HTTP on 0.0.0.0 port 80 (http://0.0.0.0:80/) ...
Login to the non-OpenZiti client machine (JAMES-Non-Ziti-SF).
setup the route first. The route is via our ER in the same DC (10.124.0.2)
root@JAMES-Non-Ziti-SF:~# ip route add 11.11.11.11/32 via 10.124.0.2
Now test the connection
root@JAMES-Non-Ziti-SF:~# curl http://11.11.11.11/hello.txt
This is file from Open-Ziti Client in Big Apple.
root@JAMES-Non-Ziti-SF:~#